Wednesday, October 31, 2012

Hey Guys!
Wow time flies! I know its been a super long time since Ive posted. I have been quite busy and haven't really had as much time as I used to for my side projects. However, I had a special request to post how my Banquette ended up turning out - special requester you know who you are :)
So here it is (Im going to eventually switch out the pillows):


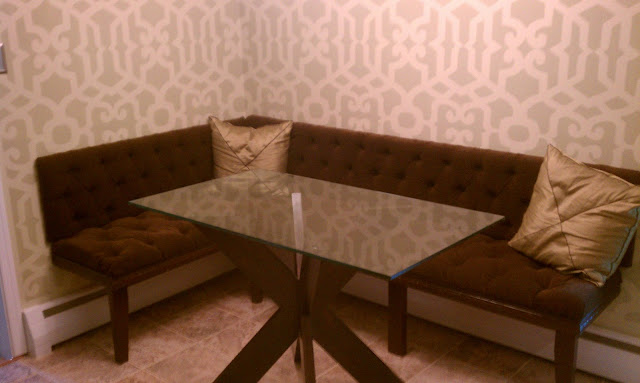
Buttt I have to tell you guys I ended up getting help from my friend who makes custom headboards. The first two pieces I did myself turned out okay but as a house warming gift, my girl Keisha offered to help me finish it up. However, when she finished the two other pieces (the backs of the bench)...hers looked sooo much better than mine so she decided to redo them for me so they would all look the same! I was sooo appreciative to her for doing that for me because I had tons of stuff to do before our housewarming cookout and she really did do a way better job than me! lol

So for all you non- DIYers out there, if you are in the Philly, MD, VA, NJ, NY area, contact her for your custom headboards or anything you need tufted! :)
http://kinycole.bigcartel.com

By the way, I got the table legs from Pier One and ordered the glass custom from a local glass shop. I ended up underestimating the measurements for glass so its a bit shorter than I wanted it to be. But I plan to get a new piece made with rounded corners that will be exactly the length I want down the road.  

Wednesday, August 29, 2012

Dining Room Wall Stencil - BEFORE & AFTER

Hey guys! Sorry I haven't posted in awhile....I have been super busy trying to get our house in order. As you know, I've gone stencil crazy these days..lol. After weeks of debating, I decided to go with the Zamira Allover Stencil by Cutting Edge Stencils for the dining room. The base color I went with is Benjamin Moore Silver Chain and went over the stencil with Benjamin Moore Metallic Liquid Silver.  I loved the way it came out! Check out the way the dining room looked when we first moved in house:


AFTER:


Thursday, August 9, 2012

Add a pop of surprise to a closet!!

One really cool thing to do in your house is to add little elements of surprise to spaces no one would expect to be decorated. For example, a closet, garage, or any other space you can think of.  I decided to get some more of my money's worth out the stencil I used for kitchen wall to give my closet/pantry a lil facelift!

I forgot to take a before pic but it was a basic closet... the walls had marks all over...so I used paint I already had for this. I went with a white base for the closet and used a light blue paint for the stencil. 

Here is how it looked as I almost finished up with the base coat. If you look at bottom of pic, you can see a little of the yellow color I covered up. 


Now here is what it looks like now (This pic was taken before I touched up everything):
Wallah.... all done! And it'll be fun to go in the closet now! :)

Monday, August 6, 2012

My Banquette is coming along....

Okay let me make a small disclaimer...I knew this project would take awhile but Lord knows I underestimated just how long it would actually take. I feel like I've been working on this forever and Im only half done. A large portion of time has been dedicated to covering the buttons... all in all I will have used close to 100 buttons on this project. I was going to use the button making kits but I read online that sometimes they don't hold up as well for thicker upholstery fabrics so I decided to use my trusty hot glue gun to cover them.  Not to mention , those button making kits are not cheap... well they are cheap if you only need 10 or 20 but for 100... def not cheap.  So I found these buttons at my local fabric store for 5cents each and used my fabric to cover them. I'm about half way done covering them..not fun at all :(


So here is how the bench is looking so far:

I still have to cover and tuft the backs and I have also decided to paint it brown...the same brown I used for the cabinet I painted in earlier posts.  And remember, I plan to post a full tutorial on how to do this when Im done!  Stay tuned!

Thursday, August 2, 2012

Amazing what a lil paint can do!

So we had an ugly built in cabinet that came with our house. My original plan was to destroy it because it def didn't go with the look of the room plus I kinda wanted to do something different in that corner until my friend suggested I keep it.  So I decided to give it a paint job!

Here is how the cabinet looked before:

I decided to use Valspar Satin Java Brown which is a great color that is very similar to the color of a lot of furniture you buy in stores.  I purchased it from Lowes for around $10
Initially, I was going to sand the whole thing then paint it, but I got lazy and decided to paint right over it.

After I finished painting the whole thing, I let it dry overnight then added a few coats of this polyurethane in satin:
Lastly, I switched out the hardware for a more updated look.  And here is the finished product!  Overall, Im very pleased and it looks even better in person.  I'm glad my friend suggested I keep it! :)

Wednesday, August 1, 2012

DIY Chair Revamp

I was looking for two accent chairs for our family room and came across these at American Signature Furniture.

They were on sale for $79 ....reg $149 each which is a pretty good deal.  Now of course I couldn't possibly leave the chairs looking like this :) ... I found some great material for $15 a yard.

This is not a really thorough tutuorial but I took the chair apart first then covered the chair. A little sewing was required for a cleaner look.


Almost Done!

Okay so the seat cushion for this chair was easy to cover...the back was a little tricky because it has a curved back so Im still working on finishing up the backside of this chair then I'll have to repeat everything for the other chair! 

Overall, recovering this chair has given it a completely different look and a chair like this could easily go for at least $150-$200 or more depending on the store so I'm very pleased with the outcome! :) 
Remember, you can do this too!!

Tuesday, July 31, 2012

DIY Frosted Glass Window Film

So as you know, I recently moved and I have tons of DIY projects I am working on and plan to post about. I may even venture to do some videos...we'll see about that though....but I'll def try to do tutorials on everything.

So today's feature is on frosted glass window film I used on glass cabinets in our kitchen.  I wanted to do a frosted look on these so people can't see straight through along with giving them a slightly more modern look.
I researched online and came across a few options to get a frosted glass window look. One thing you can use is Rust-Oleum Specialty Frosted Glass Spray but I was a little nervous if the coverage would be even. Then I found out about a few films that can be applied. I read a few reviews on Gila Window Film... a few people said it wasn't good then others didn't seem to have any issues. I figured since my windows were pretty small, I should be okay so I decided to get the Gila Window Film and Application kit (which I highly recommend).  The film cost about $22 or so and application kit costs around $7 from Lowes.


Its not hard to apply this stuff at all but depending on the size of the window you are covering it may not be a bad idea to have a helper. The basic process is spraying the window film a lot and using the squeegee that comes in kit. The website has a YouTube video I posted at the bottom of this post.

So here is how the first window came out:

Here is how the second window came out as well. Not bad at all...its exactly what I wanted.....you can see small shadows of whats inside but cant see all the way through. Also the lights in the cabinet still shine through.  Now I just have to do the other side.

So if you have a window you want a little privacy, I definitely recommend giving Gila window film a try!


Monday, July 30, 2012

My DIY Kitchen Banquette

Every since I can remember I have always loved kitchen banquettes.  I really love them near windows. I love natural light so the more windows in a home the better!

I only have one window in our kitchen in the house we just moved into but I do have a L-shaped corner that will work perfectly for a banquette.  So you guys already saw the kitchen wall stencil I did here,  My banquette will go in that corner.  So I got our contractor to make a frame for the banquette. Originally, I was going to try to be ambitious and do it myself but I figured I would leave that part to a professional :)  I probably should have told him to make the bench seat a little deeper so it would allow more seat coverage but it should work out fine. I just cant make the back too thick. I ordered a round glass table for the area so hopefully it works out when it actually comes in.

So here is the frame he did. I painted it white.

I have also decided I want to do a tufted look for the banquette and I found tons of inspiration pics on my new fave site... www.houzz.com !! Here are a few of my inspiration pics:


Stay tuned on how my version turns out! :)

Sunday, July 29, 2012

DLUX Trunk Show w/ Natt Taylor

I did a joint trunk show with designer, Natt Taylor at DLUX in Englewood, NJ two weeks ago. Here are a few pics we snapped before everything started!


Monday, July 9, 2012

Go Get It: Moving Forward with Your Vision WORKSHOP

Have a vision that God has given you that you've been eager to bring to life?  Looking for advice on how to make that critical step of faith to move forward with your vision?  If so, this invitation is for you!  Saturday, July 28th Nneka Saran, LLC will be hosting its very first entrepreneurial workshop entitled, "Go Get It: Moving Forward With Your Vision." The workshop will begin promptly at 9am and conclude at 12pm.  Be prepared to be changed as we embark on a journey together to "go get it!"  See you there!
Speakers include:
Sirena Moore-Thomas: CEO, Elohim Cleaning Contractors (multimillion dollar company), Author, Speaker, and Coach.  Featured in numerous national publications and media including Black Enterprise, New York Times, Essence, NBC Nightly News, BET-J, and many others.
Kendra Jordan: Owner, Keshajo Bakes & Season 1 contestant on TLCs Next Great Baker. Learn how she stepped out on faith to pursue her creative passion.
Blair Sandlain: Owner, PNK Elephant, online and retail store.  Learn how she and her partner has grown their business and brand into the success it is today.

Includes: Breakfast and Light Snacks
Exact location within Plymouth Meeting, PA of event will be sent out to registered attendees by July 21


If you are local or willing to drive to the Philly area, don't miss this great event!!

My Wall Stencil Project!!

I am sooo in love with wall stencils! I have been eyeballing them on various sites for quite awhile now just waiting for the time I had a chance to use them in my home. For me, they are the greatest thing since sliced bread because whenever you get ready for a new look, you can just paint over it!  I purchased two stencils from Cutting Edge Stencils and one from Etsy. This one I'm showcasing below is from Etsy and I decided to use in my kitchen where my banquette will be. 

Let me warn you, this is a super time consuming project but the outcome is well worth it! I started this around 7pm-ish (while cooking dinner in between) and finished up at 3am this morning! The wall was already painted so I decided to stick with that as the base. I purchased a quart of paint in a slightly darker shade of green (high gloss).  I gathered my tools (4" foam roller brush, Elmer's spray glue, and paint) and got busy! 

The key is to use the spray glue to stick the stencil to the wall. (Be sure to put an old sheet or drop cloth under area where spray paint will be... it can get really tacky on the floor or wherever it lands and is no fun to clean off stuff).  Also its smart to purchase a stencil level from Cutting Edge Stencils (http://www.cuttingedgestencils.com/stencil-supplies.html).  Once you go over your stencil once or twice...let it dry for a few minutes then pull it off the wall. Dont pull it off too soon because your edges may not be as clean.  Once you pull it off...let it sit for a few minutes then start again.

Here is the kitchen wall BEFORE (bad lighting):


Check out the progression:


The corners can get tricky... you have to carefully fold stencil in corners and still try to keep it straight... check out the picture (forgive me for the bad lighting...I took the pics on my phone)

Almost finish.....

ALL DONE!!!

Friday, July 6, 2012

Nneka Saran in ESSENCE!! Hubby in EBONY!

“Write the vision and make it plain on tablets,that he may run who reads it. For the vision is yet for an appointed time; but at the end it will speak, and it will not lie. Though it tarries, wait for it; because it will surely come" Habakkuk 2:2-3.
Having one of my bags featured in Essence has ALWAYS been on my vision board so this feature is extra special for me because I can now say it's happened! And it also serves as encouragement to me to keep going even when it gets hard sometimes! God sees and hears all of our dreams and desires, we just have to put our trust in HIM for our lives and most importantly the timing of everything! So with that being said...be sure to check out one of my bags in ESSENCE Aug issue page 26!!! THANK YOU JESUS!!


AND check out my husband in EBONY - July 2012 issue -- featured for his book Rededication!! 


GOD IS GOOD! :)

Wednesday, June 13, 2012

Hey guys!!

Hey yall!
Sooo Im sooo sorry I havent written on this in quite awhile! I've been super busy lately...so many things going on but I plan to start posting again soon! I will have quite a few home projects soon and I'll be sure to post about them! Hope all is well with everyone and thanks for still stopping by my blog! :)


Related Posts with Thumbnails