Showing posts with label DIY. Show all posts

Thursday, August 29, 2013

DIY Mirrored Dresser TUTORIAL


I lovveeee mirrored furniture! Every time I see something mirrored in stores, I just drool.  But most mirrored furniture can be pretty pricey. Even at Home Goods, you are usually going to pay at least $249 for most sizable pieces. So I thought there has to be a way to make my own, right? I needed 2 nightstands for my bedroom so I decide to give the Rast dresser from Ikea an overhaul!

I have two small disclaimers before we begin: I did not take enough pics as I was doing this to really give a  good visual of every step BUT this was a really easy DIY project to do so I think it will be fine. Also, its kinda hard to take great pics of mirrored furniture because you can see everything in the reflection lol. The pics don't really do the finished product justice, it looks wayyy better in person,  but you get the idea.  I didn't really think about getting back into blogging until after I was done lol. Nevertheless, here goes!

Materials Needed:
Rast 3 Drawer Dresser from Ikea - $35
3 cans of Spray paint of your choice- $12
Custom cut mirrors (from your local glass/mirror shop )- $77
Mirror/Mosaic adhesive (can be purchased where you get mirrors made) - $9
Knobs/Pulls to replace wood knobs - $9
Nailheads (optional)
Drill

Time to Complete:
1 Day project (once you have all materials in hand)

Steps
1. Assemble your RAST dresser. It takes about 30 min if that... its very easy to put together. Don't bother adding the back piece to it yet or the knobs on the drawers.

2. Measure the areas that will have mirrors on them so that would include the top of dresser, front of drawers, and sides if you choose. Don't measure from end to end... leave a little bit of room on each side so it wont be exacly the same size. This will prevent any issues with closing the drawers.  Once you have your measurements all set,  go to your local glass shop and order your mirrors.  My shop took about 2 days to do them for me. Also unless you plan to add your own holes, you have to request holes put in your mirrors as well. My place charged an extra $10 per hole.  If you want to use the measurements I took to my guys, here they are:
TOP (1): 23" X 11 1/4" (Thickness of mirror - 3/16") Top piece is thicker since you will be sitting things on it
DRAWERS (3):  22 3/4" X 7 1/8"  (Thickness of mirror - 1/8")
HOLE SIZE for drawers: 1/4" Hole in center

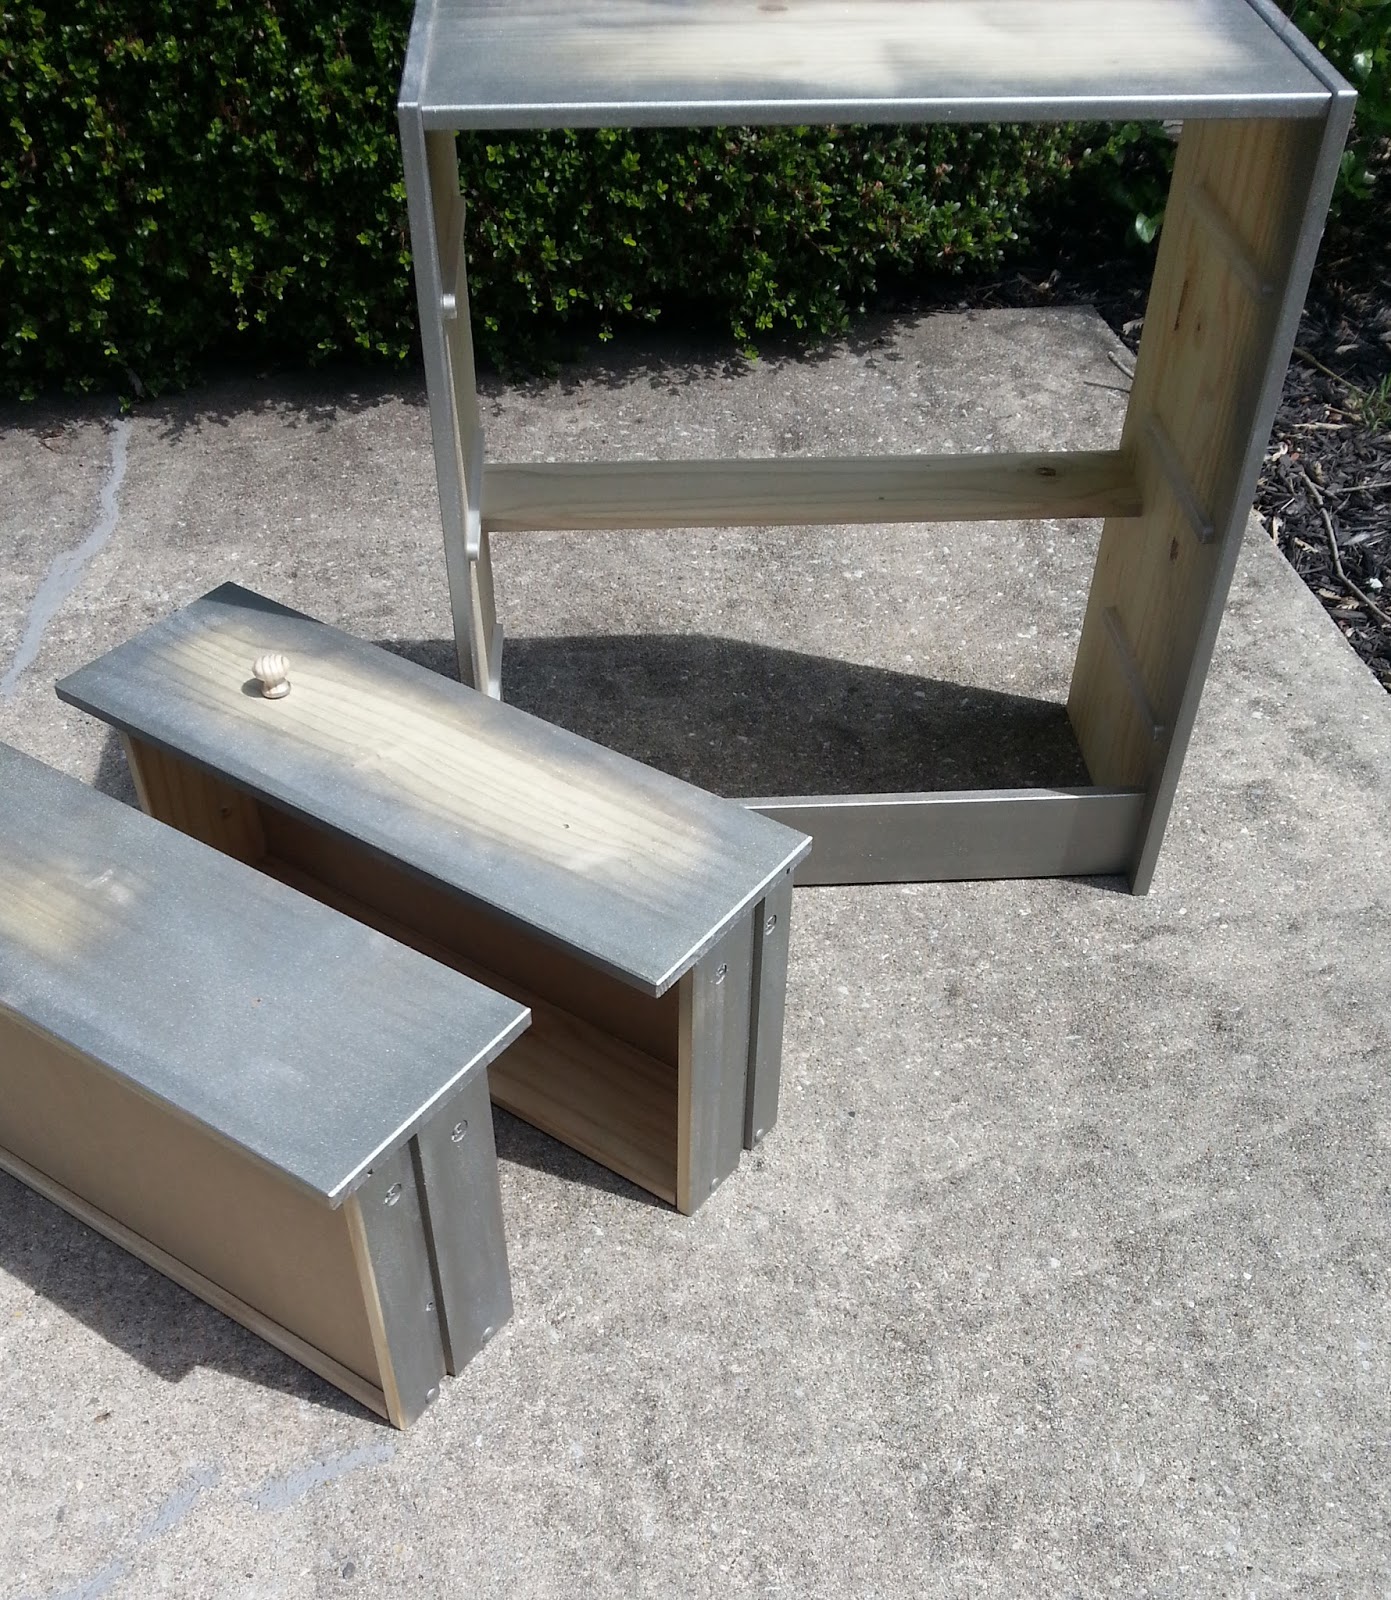
3. Once dresser is assembled, spray paint your dresser to your desired color. The wood is very porous and  it kinda soaks up the paint.  I originally bought 2 cans but ended up using 3 cans. It prob also depends on the color you go with too. I went with Rust-Oleum Silver and I found myself having to spray alot to get an even finish.  But remember you only need to paint the outer edges of the drawers. For the base of the dresser, you only need to paint the edges of the top. I cheated and did not put mirrors on the sides of the dresser so I had to fully paint that but if you choose to add mirrors to the sides, you only need to spray paint the edges of sides as well. See below:
4.  Next step is optional, I love nailheads so I decided to add them to my dresser.  You can order a roll of nailheads online. They are super easy to put on...just make sure you use a rubber mallet and not a regular hammer to put them on.  Here is how the nailheads look once I finished putting them on. 
 
5.  Now its time to take out the mirrors for your drawers, the ones with the holes.  Place the mirror over the drawer and mark on the drawer where the hole is. Remover the mirror and drill your hole.  Repeat process from the other 2 drawers.  Once thats done, its time to glue the mirrors on.
Take out your adhesive and spread over back of mirrors...but sure not to put glue too close to the edges so it won't ooze out on sides. Once you glue all the mirrors on, get a few heavy books and place them on top of them and sit to side. Normally, they suggest at least 24 hours for glue to cure but its usually cured before then. But to be on safe side, give it at least 12-24 hours to dry.

6. Once everything is dry, add your knobs or pulls onto the drawers. BUT, be sure not to make the mistake I made on one of drawers. If you twist your knob on too tight, you can crack the mirror.  I made this oops on the 2nd dresser I did so I was little bumbed but you really can't see it well unless you really look. So hopefully you don't make that mistake. See below:

7.  Once you add the knobs, put your drawers back in dresser and you're all done! Not bad for a DIY project huh? I was extremely pleased with the way they turned out!


Thrift Find!

I really love to thrift but just like regular shopping, its a hit or miss. Well, about a month or so ago, I lucked up on some GREAT finds for a steal!

Check out this chair I got for $15! I plan to paint it white and reupholster it in a pretty fabric. Stay tuned for that!


 And check out this sofa I scored for only $35!!! The bones are soo great on this! Cant wait to reupholster this one too! I just have to figure out what fabric I want to use!


Tuesday, August 27, 2013

Ikea RAST Overhaul

Hey guys!
I know its been awhile but Im back to blogging now! I gave my blog a new look too if you've noticed! So remember to stop by regularly as I'll be updating with different things!

Ive recently been working on a number of projects. One is a DIY project with the Rast dresser from Ikea. This dresser is only $35 or so and you can really do so many different things with it! I chose to turn it into a mirrored dresser. Stay tuned for a tutorial and how the two I did came out! 

http://www.ikea.com/us/en/catalog/products/75305709/

Monday, July 15, 2013

BEFORE & AFTER - Chaise

Unfortunately,  I don't have a tutorial of how I did this Before and After but I purchased this ugly chaise from Marshalls for $100... regularly $299.   I bought this fabric from Mood Fabrics in NY and reupholstered this piece. It took a little time to finish it because I ran out of fabric but I loved the way it came out! Check it out!


Wednesday, August 29, 2012

Dining Room Wall Stencil - BEFORE & AFTER

Hey guys! Sorry I haven't posted in awhile....I have been super busy trying to get our house in order. As you know, I've gone stencil crazy these days..lol. After weeks of debating, I decided to go with the Zamira Allover Stencil by Cutting Edge Stencils for the dining room. The base color I went with is Benjamin Moore Silver Chain and went over the stencil with Benjamin Moore Metallic Liquid Silver.  I loved the way it came out! Check out the way the dining room looked when we first moved in house:


AFTER:


Thursday, August 9, 2012

Add a pop of surprise to a closet!!

One really cool thing to do in your house is to add little elements of surprise to spaces no one would expect to be decorated. For example, a closet, garage, or any other space you can think of.  I decided to get some more of my money's worth out the stencil I used for kitchen wall to give my closet/pantry a lil facelift!

I forgot to take a before pic but it was a basic closet... the walls had marks all over...so I used paint I already had for this. I went with a white base for the closet and used a light blue paint for the stencil. 

Here is how it looked as I almost finished up with the base coat. If you look at bottom of pic, you can see a little of the yellow color I covered up. 


Now here is what it looks like now (This pic was taken before I touched up everything):
Wallah.... all done! And it'll be fun to go in the closet now! :)

Monday, August 6, 2012

My Banquette is coming along....

Okay let me make a small disclaimer...I knew this project would take awhile but Lord knows I underestimated just how long it would actually take. I feel like I've been working on this forever and Im only half done. A large portion of time has been dedicated to covering the buttons... all in all I will have used close to 100 buttons on this project. I was going to use the button making kits but I read online that sometimes they don't hold up as well for thicker upholstery fabrics so I decided to use my trusty hot glue gun to cover them.  Not to mention , those button making kits are not cheap... well they are cheap if you only need 10 or 20 but for 100... def not cheap.  So I found these buttons at my local fabric store for 5cents each and used my fabric to cover them. I'm about half way done covering them..not fun at all :(


So here is how the bench is looking so far:

I still have to cover and tuft the backs and I have also decided to paint it brown...the same brown I used for the cabinet I painted in earlier posts.  And remember, I plan to post a full tutorial on how to do this when Im done!  Stay tuned!

Wednesday, August 1, 2012

DIY Chair Revamp

I was looking for two accent chairs for our family room and came across these at American Signature Furniture.

They were on sale for $79 ....reg $149 each which is a pretty good deal.  Now of course I couldn't possibly leave the chairs looking like this :) ... I found some great material for $15 a yard.

This is not a really thorough tutuorial but I took the chair apart first then covered the chair. A little sewing was required for a cleaner look.


Almost Done!

Okay so the seat cushion for this chair was easy to cover...the back was a little tricky because it has a curved back so Im still working on finishing up the backside of this chair then I'll have to repeat everything for the other chair! 

Overall, recovering this chair has given it a completely different look and a chair like this could easily go for at least $150-$200 or more depending on the store so I'm very pleased with the outcome! :) 
Remember, you can do this too!!

Tuesday, July 31, 2012

DIY Frosted Glass Window Film

So as you know, I recently moved and I have tons of DIY projects I am working on and plan to post about. I may even venture to do some videos...we'll see about that though....but I'll def try to do tutorials on everything.

So today's feature is on frosted glass window film I used on glass cabinets in our kitchen.  I wanted to do a frosted look on these so people can't see straight through along with giving them a slightly more modern look.
I researched online and came across a few options to get a frosted glass window look. One thing you can use is Rust-Oleum Specialty Frosted Glass Spray but I was a little nervous if the coverage would be even. Then I found out about a few films that can be applied. I read a few reviews on Gila Window Film... a few people said it wasn't good then others didn't seem to have any issues. I figured since my windows were pretty small, I should be okay so I decided to get the Gila Window Film and Application kit (which I highly recommend).  The film cost about $22 or so and application kit costs around $7 from Lowes.


Its not hard to apply this stuff at all but depending on the size of the window you are covering it may not be a bad idea to have a helper. The basic process is spraying the window film a lot and using the squeegee that comes in kit. The website has a YouTube video I posted at the bottom of this post.

So here is how the first window came out:

Here is how the second window came out as well. Not bad at all...its exactly what I wanted.....you can see small shadows of whats inside but cant see all the way through. Also the lights in the cabinet still shine through.  Now I just have to do the other side.

So if you have a window you want a little privacy, I definitely recommend giving Gila window film a try!


Monday, July 30, 2012

My DIY Kitchen Banquette

Every since I can remember I have always loved kitchen banquettes.  I really love them near windows. I love natural light so the more windows in a home the better!

I only have one window in our kitchen in the house we just moved into but I do have a L-shaped corner that will work perfectly for a banquette.  So you guys already saw the kitchen wall stencil I did here,  My banquette will go in that corner.  So I got our contractor to make a frame for the banquette. Originally, I was going to try to be ambitious and do it myself but I figured I would leave that part to a professional :)  I probably should have told him to make the bench seat a little deeper so it would allow more seat coverage but it should work out fine. I just cant make the back too thick. I ordered a round glass table for the area so hopefully it works out when it actually comes in.

So here is the frame he did. I painted it white.

I have also decided I want to do a tufted look for the banquette and I found tons of inspiration pics on my new fave site... www.houzz.com !! Here are a few of my inspiration pics:


Stay tuned on how my version turns out! :)

Wednesday, April 11, 2012

My DIY Kitchen Island

After finishing up my back splash project, I decided to attempt to do a DIY kitchen island. I looked into getting a slab to match the laminate that is on our counter tops...but after getting the quote back for around $400 for it... I decided I'd go with the butcher block look. 

First step was purchasing a cabinet base from Home Depot. It cost $139 but since the one we got had a little knick...they took off $20. Here is how the cabinet base looked when we first bought it:

Next, I stained the cabinet base Colonial Maple which was the closest color I could find to our current cabinets. The backside of the cabinet base is unfinished, so I purchased a piece of wood and nailed it to the back of cabinet base.  See pic below:

Since I wanted to add a little pizazz to the island, I decided to add tiles to the back side. So I used the same process as I did for the back splash for the back side of the island base. 


After that was done, it was time to move on to the actual countertop.  I purchased a 4X8 piece of pine for the countertop and got it cut in two equal sized pieces (to stack on top of each other).  But I made a big mistake by getting pine because the cabinet base is oak.  So after I stained the pine countertop, I quickly realized I should have gotten oak for the countertop because the stain takes differently on different types of wood.  So since I had already purchased the pine and didn't want to completely waste the wood, I decided to keep it and just buy a thin piece of oak to put on top of the two pieces of pine. Also, we added the handles and knobs to the drawers and doors.  See pic below:


We attached all the boards together with a few nails and screws and then it was time to do the edging.  I purchased iron on veneer siding from Lowes. It was $5.46 per roll and I ended up using two rolls.  My island counter top dimensions are 35X48. 

This stuff is pretty cool because you just use an iron to adhere it.  I also purchased the Band It cutter which helps you cut off any excess.  Def make sure you purchase this. Here is how the edging looked after I affixed it to the edges:
After applying, I stained the edging and then did 3 coats of polyurethane and walah... all done! :)
Not bad for about $200 or so!


Friday, April 6, 2012

My DIY Backsplash

Ive been soooo busy lately, that I haven't had much time at all to do any projects at really. And I've truly been missing it. So two weekends ago while my hubby was out of town, I decided to tackle doing backsplash in our kitchen!

Ive been wanting to try it for quite awhile now but never had the motivation. Its definitely time consuming but the outcome is well worth it. I used less expensive tiles because my rule is to never spend too too much on a DIY project I'm trying for the first time. No need to lose unnecessary money if it doesn't come out well! But thank God, we LOVE the way it turned out!

All in all, it cost under $200 to do it.

I will have to scan the full before picture but here is a pic of one of the walls before the backsplash.

I got all my materials together...the backsplash tiles, thin set mortar, trowel, grout, rubber grout float, sponges, buckets, and gloves. 

A quick tip I learned is that you should never use pre-mixed grout.  Of course, I bought that first but luckily I researched it before opening so I took it back and got a bag of powdered grout that has to be mixed with water. Its an extra step but apparently it holds up better. Here is the bag of grout I got ... it was about $14 from Home Depot. 
 
 Next you pretty much follow the instructions on bag for mixing the grout... they don't really tell you how much water to mix in..you kinda just have to figure it out. As long as you get the consistency of peanut butter you are good. The goal is to mix it up thick enough where it wont be runny.  Start off with a little bit of water and powder and add each as needed to get to desired consistency. Here is how my grout look as I started mixing it.

After I applied the adhesive/thin set mortar to the wall and affixed the tiles, you let it set for 24-48 hrs. Make sure you clean up any adhesive that is oozing through the tiles.   I let it sit for about 24 hours then applied grout. Here is how the grout looked when I applied it on the tiles. The key when applying grout is to make sure you get it in all the cracks.  

 After I applied grout, I let it sit for about 10-15 min, then wiped it down with a sponge and clean water. Make sure you wring out the sponge really well. After that, let it sit for awhile then take a soft cloth and go back over tiles to get the glaze off.  Here is how it looked after it was wiped down:

 Here is how it looked after!
Next project is a DIY kitchen island...will post ya on how it turns out! :)

Saturday, April 30, 2011

My Zebra Print Wall for Office

So after debating for quite awhile about what to do with the back wall in my office, I decided to go with a zebra print. Originally, I actually wanted to use a wall stencil for this really nice Moroccan print I found online....but it didn't necessarily go with my look.  But I plan to incorporate that somewhere one day because I really do love it!! Anywho, back to the zebra print walls. They also sell wall stencils for zebra print but I couldn't find a style I liked ..not to mention, some wall stencils surprisingly can get pretty pricey.  The Moroccan one I really like was $55 for the stencil.  So since I'm a DIY'er... I figured I could just freehand it myself ... and it came out pretty good I think.

I started off sketching the zebra stripes on the wall but ended up free-handing the rest. Zebra stripes are one of the easiest things to do because they don't have to be perfect to look good!

Here is my progression from start to finish: 
Related Posts with Thumbnails