Monday, July 9, 2012

My Wall Stencil Project!!

I am sooo in love with wall stencils! I have been eyeballing them on various sites for quite awhile now just waiting for the time I had a chance to use them in my home. For me, they are the greatest thing since sliced bread because whenever you get ready for a new look, you can just paint over it!  I purchased two stencils from Cutting Edge Stencils and one from Etsy. This one I'm showcasing below is from Etsy and I decided to use in my kitchen where my banquette will be. 

Let me warn you, this is a super time consuming project but the outcome is well worth it! I started this around 7pm-ish (while cooking dinner in between) and finished up at 3am this morning! The wall was already painted so I decided to stick with that as the base. I purchased a quart of paint in a slightly darker shade of green (high gloss).  I gathered my tools (4" foam roller brush, Elmer's spray glue, and paint) and got busy! 

The key is to use the spray glue to stick the stencil to the wall. (Be sure to put an old sheet or drop cloth under area where spray paint will be... it can get really tacky on the floor or wherever it lands and is no fun to clean off stuff).  Also its smart to purchase a stencil level from Cutting Edge Stencils (http://www.cuttingedgestencils.com/stencil-supplies.html).  Once you go over your stencil once or twice...let it dry for a few minutes then pull it off the wall. Dont pull it off too soon because your edges may not be as clean.  Once you pull it off...let it sit for a few minutes then start again.

Here is the kitchen wall BEFORE (bad lighting):


Check out the progression:
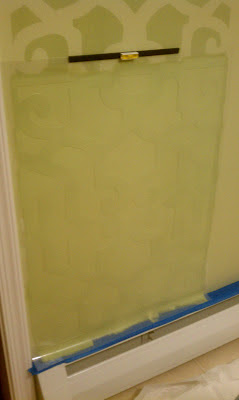


The corners can get tricky... you have to carefully fold stencil in corners and still try to keep it straight... check out the picture (forgive me for the bad lighting...I took the pics on my phone)

Almost finish.....

ALL DONE!!!

Friday, July 6, 2012

Nneka Saran in ESSENCE!! Hubby in EBONY!

“Write the vision and make it plain on tablets,that he may run who reads it. For the vision is yet for an appointed time; but at the end it will speak, and it will not lie. Though it tarries, wait for it; because it will surely come" Habakkuk 2:2-3.
Having one of my bags featured in Essence has ALWAYS been on my vision board so this feature is extra special for me because I can now say it's happened! And it also serves as encouragement to me to keep going even when it gets hard sometimes! God sees and hears all of our dreams and desires, we just have to put our trust in HIM for our lives and most importantly the timing of everything! So with that being said...be sure to check out one of my bags in ESSENCE Aug issue page 26!!! THANK YOU JESUS!!


AND check out my husband in EBONY - July 2012 issue -- featured for his book Rededication!! 


GOD IS GOOD! :)

Wednesday, June 13, 2012

Hey guys!!

Hey yall!
Sooo Im sooo sorry I havent written on this in quite awhile! I've been super busy lately...so many things going on but I plan to start posting again soon! I will have quite a few home projects soon and I'll be sure to post about them! Hope all is well with everyone and thanks for still stopping by my blog! :)


Wednesday, April 11, 2012

My DIY Kitchen Island

After finishing up my back splash project, I decided to attempt to do a DIY kitchen island. I looked into getting a slab to match the laminate that is on our counter tops...but after getting the quote back for around $400 for it... I decided I'd go with the butcher block look. 

First step was purchasing a cabinet base from Home Depot. It cost $139 but since the one we got had a little knick...they took off $20. Here is how the cabinet base looked when we first bought it:

Next, I stained the cabinet base Colonial Maple which was the closest color I could find to our current cabinets. The backside of the cabinet base is unfinished, so I purchased a piece of wood and nailed it to the back of cabinet base.  See pic below:

Since I wanted to add a little pizazz to the island, I decided to add tiles to the back side. So I used the same process as I did for the back splash for the back side of the island base. 


After that was done, it was time to move on to the actual countertop.  I purchased a 4X8 piece of pine for the countertop and got it cut in two equal sized pieces (to stack on top of each other).  But I made a big mistake by getting pine because the cabinet base is oak.  So after I stained the pine countertop, I quickly realized I should have gotten oak for the countertop because the stain takes differently on different types of wood.  So since I had already purchased the pine and didn't want to completely waste the wood, I decided to keep it and just buy a thin piece of oak to put on top of the two pieces of pine. Also, we added the handles and knobs to the drawers and doors.  See pic below:


We attached all the boards together with a few nails and screws and then it was time to do the edging.  I purchased iron on veneer siding from Lowes. It was $5.46 per roll and I ended up using two rolls.  My island counter top dimensions are 35X48. 

This stuff is pretty cool because you just use an iron to adhere it.  I also purchased the Band It cutter which helps you cut off any excess.  Def make sure you purchase this. Here is how the edging looked after I affixed it to the edges:
After applying, I stained the edging and then did 3 coats of polyurethane and walah... all done! :)
Not bad for about $200 or so!


Tuesday, April 10, 2012

NOMINATE a Phenomenal Woman WINNER!!!

Please join me in congratulating Dr. Anna Aisha Manns for being selected as our Phenomenal Woman Winner!

Her best friend, Beth, submitted her for the contest.  It was a tough decision but this entry received the most votes out of them all. Check out Beth's submission about this phenomenal woman!

 
Not many people can be truly beautiful inside and out, but my best friend, Dr. Anna Aisha Manns, is because of her amazing heart, strength, and her drive.
Her amazing heart: In May 2011 I traveled for work, because I have been taking care of my mother I asked Aisha to help watch my mom by giving meds, cooking, etc. On the day of my return my mom passed way, Aisha was the one that found her. My flight returning home was already in the air and by the time I landed she had the coroner come, had the death certificate signed, and a list of funeral homes ready with the recommendation of which one is best based on cost and customer service. She picked me up from the airport and broke the news to me, can you imagine how hard it was to tell your best friend of more than a decade something like that? Needless to say the days following when I couldn’t get out of bed, she crawled in with me.
Her strength: Her courage got me through the hardest time in my life, which reminded me that throughout everything, good or bad, she has always been there. She became my rock and I can never repay her for that.
Her drive: My BFF has lupus; I have seen her sick, pale, and even struggling. But she still pushed herself through college and became a Doctor, and I have watched her achieve certifications in which only few in the USA have!
She’s honorable, kind, amazing… a superwoman. And I’m glad to have her as a sister.
Related Posts with Thumbnails