

I lovveeee mirrored furniture! Every time I see something mirrored in stores, I just drool. But most mirrored furniture can be pretty pricey. Even at Home Goods, you are usually going to pay at least $249 for most sizable pieces. So I thought there has to be a way to make my own, right? I needed 2 nightstands for my bedroom so I decide to give the Rast dresser from Ikea an overhaul!
I have two small disclaimers before we begin: I did not take enough pics as I was doing this to really give a good visual of every step BUT this was a really easy DIY project to do so I think it will be fine. Also, its kinda hard to take great pics of mirrored furniture because you can see everything in the reflection lol. The pics don't really do the finished product justice, it looks wayyy better in person, but you get the idea. I didn't really think about getting back into blogging until after I was done lol. Nevertheless, here goes!
Materials Needed:
3 cans of Spray paint of your choice- $12
Custom cut mirrors (from your local glass/mirror shop )- $77
Mirror/Mosaic adhesive (can be purchased where you get mirrors made) - $9
Knobs/Pulls to replace wood knobs - $9
Nailheads (optional)
Drill
Time to Complete:
1 Day project (once you have all materials in hand)
Steps
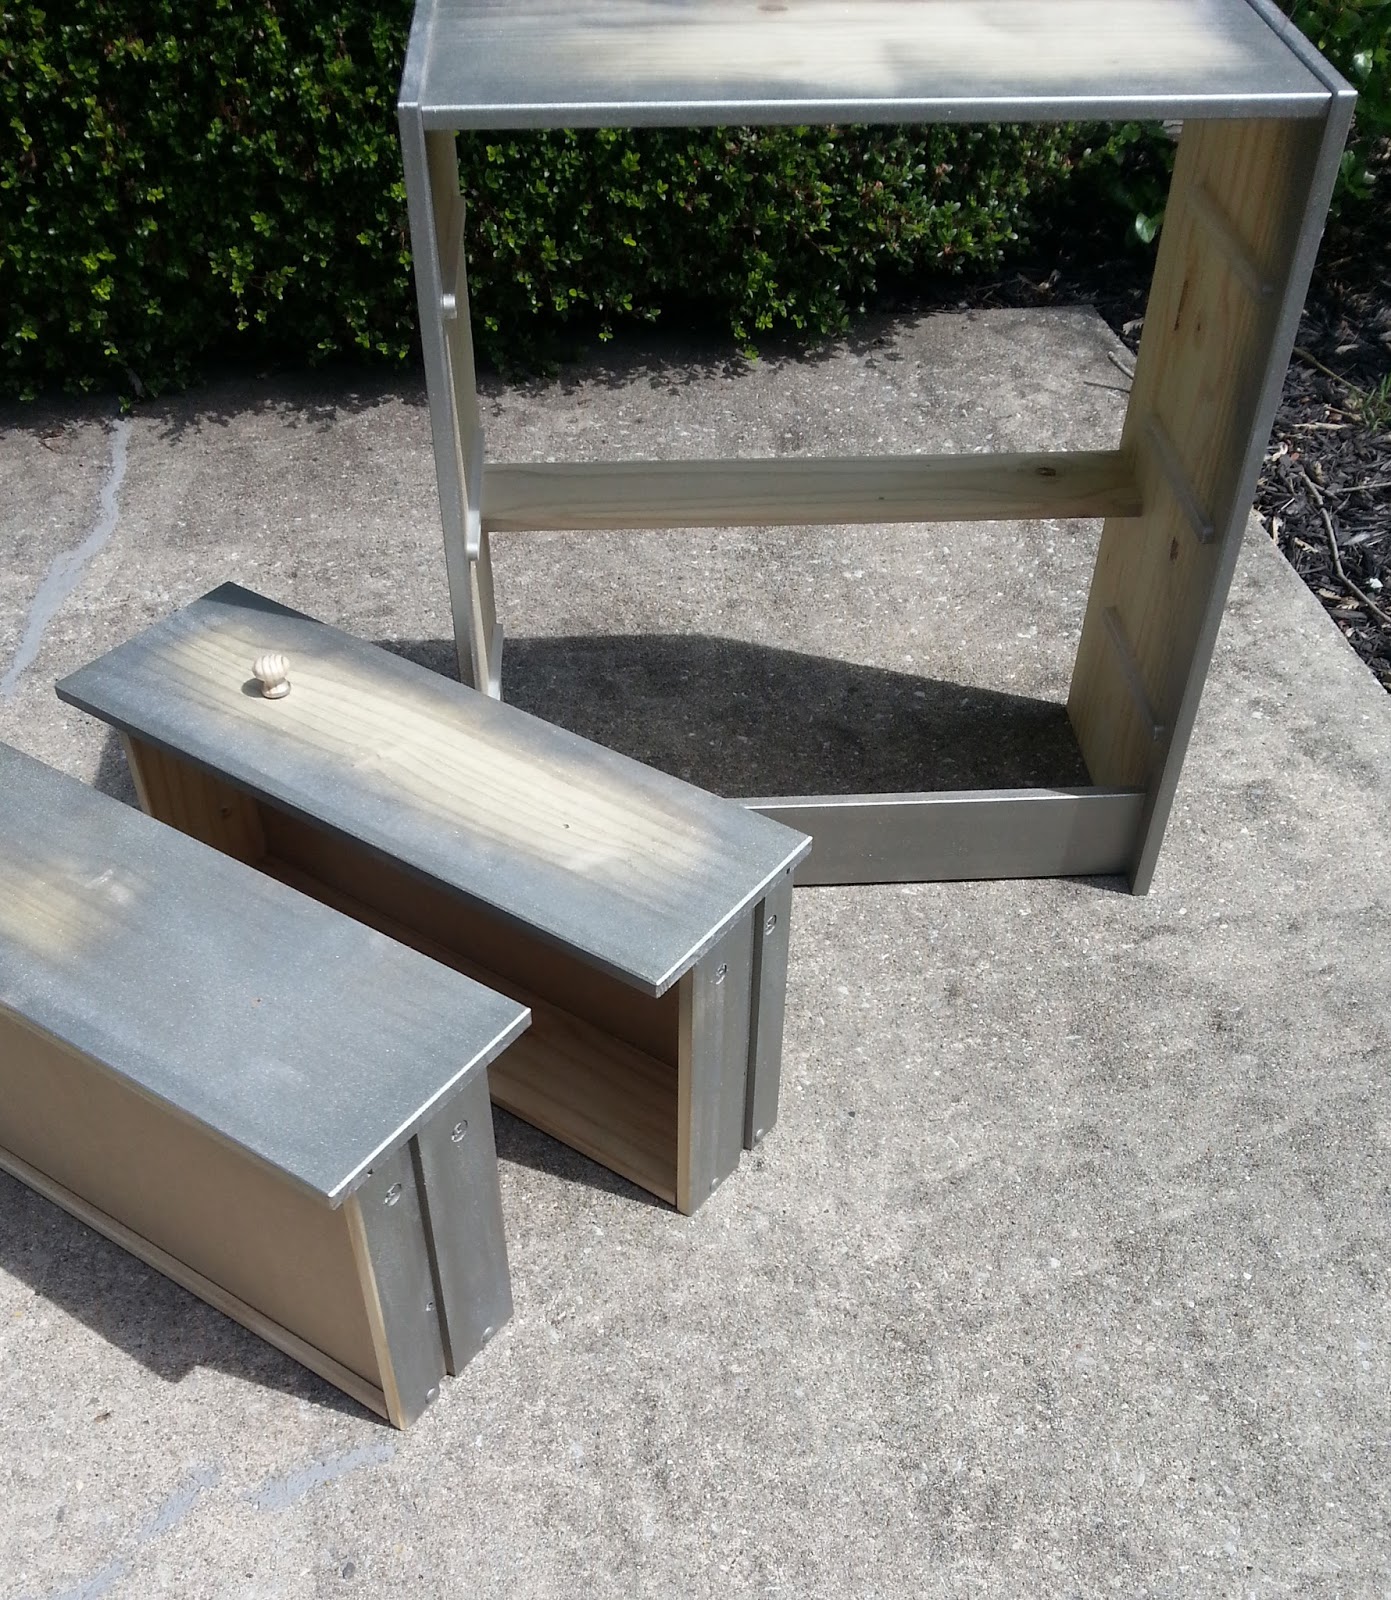
1. Assemble your RAST dresser. It takes about 30 min if that... its very easy to put together. Don't bother adding the back piece to it yet or the knobs on the drawers.
2. Measure the areas that will have mirrors on them so that would include the top of dresser, front of drawers, and sides if you choose. Don't measure from end to end... leave a little bit of room on each side so it wont be exacly the same size. This will prevent any issues with closing the drawers. Once you have your measurements all set, go to your local glass shop and order your mirrors. My shop took about 2 days to do them for me. Also unless you plan to add your own holes, you have to request holes put in your mirrors as well. My place charged an extra $10 per hole. If you want to use the measurements I took to my guys, here they are:
TOP (1): 23" X 11 1/4" (Thickness of mirror - 3/16") Top piece is thicker since you will be sitting things on it
DRAWERS (3): 22 3/4" X 7 1/8" (Thickness of mirror - 1/8")
HOLE SIZE for drawers: 1/4" Hole in center
3. Once dresser is assembled, spray paint your dresser to your desired color. The wood is very porous and it kinda soaks up the paint. I originally bought 2 cans but ended up using 3 cans. It prob also depends on the color you go with too. I went with Rust-Oleum Silver and I found myself having to spray alot to get an even finish. But remember you only need to paint the outer edges of the drawers. For the base of the dresser, you only need to paint the edges of the top. I cheated and did not put mirrors on the sides of the dresser so I had to fully paint that but if you choose to add mirrors to the sides, you only need to spray paint the edges of sides as well. See below:
4. Next step is optional, I love nailheads so I decided to add them to my dresser. You can order a roll of nailheads online. They are super easy to put on...just make sure you use a rubber mallet and not a regular hammer to put them on. Here is how the nailheads look once I finished putting them on.

5. Now its time to take out the mirrors for your drawers, the ones with the holes. Place the mirror over the drawer and mark on the drawer where the hole is. Remover the mirror and drill your hole. Repeat process from the other 2 drawers. Once thats done, its time to glue the mirrors on.
Take out your adhesive and spread over back of mirrors...but sure not to put glue too close to the edges so it won't ooze out on sides. Once you glue all the mirrors on, get a few heavy books and place them on top of them and sit to side. Normally, they suggest at least 24 hours for glue to cure but its usually cured before then. But to be on safe side, give it at least 12-24 hours to dry.

6. Once everything is dry, add your knobs or pulls onto the drawers. BUT, be sure not to make the mistake I made on one of drawers. If you twist your knob on too tight, you can crack the mirror. I made this oops on the 2nd dresser I did so I was little bumbed but you really can't see it well unless you really look. So hopefully you don't make that mistake. See below:

7. Once you add the knobs, put your drawers back in dresser and you're all done! Not bad for a DIY project huh? I was extremely pleased with the way they turned out!


Turned out really well. Love the nailhead accents.
ReplyDeleteVery nice. Where did you order the nailheads from?
ReplyDeleteNailheads can be purchased at http://www.diyupholsterysupply.com/DIYNAILS.html
ReplyDeleteOur Mirrors design would make you pleasure with its artistic strategy and measurement. Generally, we offer several categories of mirrors and best custom mirror for our respected customers. By the way, if you want to make your house beautiful with world class mirrors just visit website makes your decision.
ReplyDeleteHanging a heavy framed mirror can seem a little tricky because you are handling something that is very fragile and it is important that it is secured firmly on the wall. While it is always preferable that you get professionals to hang your mirror, we do have a few DIY mirror installation tips that you might find helpful.
ReplyDeleteCheck out my Latest content, top 13 home decorating ideas. I think you must love it.
ReplyDeleteHi! i'm really looking forward to working on these this weekend! looks beautiful! can you please post the exact link for the nail heads? I went to the link above and there are SO MANY options! just want to make sure i purchase the right ones! Also, is there a reason you didn't assemble the backboard of the nightstands? thank you!
ReplyDeleteI second what Randa said above... Can you please post the exact link for the nailheads you used. I would like to buy ones I know are going to look good, like yours. Thank you!
ReplyDeleteThanks a lot, from seller Meja Rias Jati
ReplyDelete